Monday, 25 June 2018

GoPro Hero 5 Black

It has been awhile since I have bought anything from an IT Show. At the recent PC Show from 31st May to 3rd June 2018, I bought the GoPro Hero 5 Black for SGD440. There was a good package for that price because it includes:

- the GoPro Hero 5 Black
- the Shorty (Mini extension pole with tripod)
- the Casey which is a hardcover accessories case
- the Chesty, which is the performance chest mount. Must be tough for them to think of the names of their accessories.
- 32GB Extreme Sandisk Memory card

All these worth about SGD610 originally.

In addition, I bought the Dual Battery Charger. It comes with an extra battery since the GoPro already includes a battery. Having a spare battery is always good as I found out the GoPro battery does not last long, especially after extensive usage.

The GoPro Hero 5 specs:
Photo: 12MP / 30fps Burst
Video: 4K30
Waterproof: upto 10metres
Voice Control: Yes
Video Stablization: Yes
Touch Display: Yes
Karma Compatible: Yes

Advanced Settings
Auto LowLight: Yes
Exposure control: Yes
Protune: Yes
3.5mm Audio Mic In: Yes

Audio Features
Advanced Wind Noise Reduction: 3-mic processing
Stereo Audio: Yes
RAW Audio Capture: .wav format

Connected Features
Wifi + Bluetooth: Yes
GPS: Yes
Connects to GoPro App: yes
HDMI Video Out: Yes

Unboxing

Hero5 - Front

Side with items included

QuukStories is the GoPro app to edit the
videos.

Summary of capabilities.

Includes the frame

Various Youtube videos mentioned about
keeping the blackbase

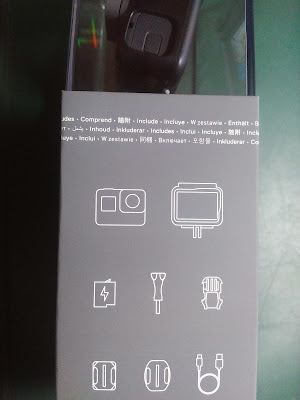
Standard package items. The GoPro uses USB-C as
the charging and data cable.

With the documentation.

Another view of the items and the battery provided.

It comes with 32GB Extreme Memory card.
I bought this 64GB in this picture. 
I have used the GoPro video on my recent trip to Bali, a few weeks after I purchased it. The video quality is amazing, even in the water. I can see that it tries to stabilises the video during shooting but the best result will be using a gimble. At night, the GoPro is almost useless. So I have to switch to a normal point and shoot camera. 

Saturday, 5 May 2018

Kartell Bourgie Lamp Dimmer Switch Replacement

I have a pair of Kartell Bourgie Lamps which I blogged about here.  The old Bourgie lamp has a very bad dimmer switch. It does not last long, which I also blogged about here

Thankfully, Kartell has a replacement dimmer switch is so much better than the original one. It is not cheap though but it is definitely worth the change.


I bought 2 replacement dimmer switch.


The dimmer switch with instructions.


The original dimmer switch on the left. The problem with it
was the roller was very flimsy. The new switch is a slider. 


Another view.


The back view. Its quite cool that it has PC board.


Instructions with no words.


Need to be careful in removing the original wire.


On the left of the switch, it is indicated L for Live and N for
Neutral. So the wire that is removed from L, I have labeled
with Red tape, as can be seen on the bottom left hand corner.


On the other side of the switch, take note of the N - Neutral
wire.


The broken switch that needs to be replaced,
The Red labeled wire is the Live wire.


The tools that I used for this project.


The wires properly labeled.


Using the spudger to lift up the slider switch.


Once the slider is taken off, the 2 screws
underneath needs to be removed.


With the cover removed.


With the white wire holder removed. You
can see a small N letter on the bottom
screw.


So the blue wire goes to Neutral.


With both ends connected.


With the back screwed back and the slider in its place.


Thankfully, it worked when turned on.


Friday, 2 March 2018

Kartell Louis Ghost Chair Replacement Rubber Glides

I have four of the Louis Ghost chair in clear polycarbonate, used it as dining chairs. The wife and I choose clear so that it gives an illusion of space, that was what the guy at the store said.

The chair uses a rubber/silicon stopper as glides on the its's legs. As expected in this harsh humid weather, the rubber glide began to perish. Bits and pieces started to fall out from the original rubber glide. It is quite unfortunate that Kartell would use such material on its chair. Maybe it did not consider how heat and humidity would affect its material. Luckily, the whole polycarbonate material is still in good condition.

Searching online, I could not find any resources on getting replacements. I have read about owners placing socks over the crumbing rubber glides. But it is very ugly. The design of the chair is very nice but you do not want to mar its design by putting 2 pairs of socks over the chair's legs.


The rubber glide has disintegrated slowly, exposing the clear
polycarbonate around the edge. 


I bought the Steve and Leif Felt Sliders from the local DIY store to see if it is a suitable replacement for the chairs. For me, felt is much better than rubber as it slides with no resistance. It has an adhesive at the back, which means I can remove and easily replace it.


Felt sliders.


The ones that I bought was a diameter of 38mm.


There were a lot of trial and error in getting the right dimension of the leg end. But I find the following to be the easiest.


I would need to remove the old rubber glides. I cut off the protruding pieces with a sharp penknife, making sure it is flush with the polycarbonate edges. However, I leave the main part within the leg. I did not remove this part so that it does not become hollow inside the chair.


Removing the edges with a sharp penknife.
Making sure it is flush with the edges.

After I have removed any stray strands and cleaned it, I made an imprint of the leg's end. I used a masking tape.


Using a masking tape to make an imprint of the dimension of the leg's end.


Removing the masking tape, I cut the edges and the excess.

As you can see, the chair's leg is not a square but a trapezoid. Making
an imprint gives you a better image of it.


Next, I will place the masking tape over the felt adhesive side.

With the masking tape over the felt.


Cut off the excess edges.

Edges are cut off with a sharp penknife.


With the felt slider cut into shape, I remove the adhesive paper and stick it to the edge.

Making sure that the tapered sides are correct.


I have replaced all 4 rubber glides with the felt ones for this particular chair. It is much quieter and it slides in and out faster.

The most important part is, I do not need to buy actual replacements from Kartell. The colour of the felt does not affect the overall nature of the clear polycarbonate Kartell chair.


Rad about my other Kartell posts:
Kartell Bourgie Lamp
Kartell Optic Container