Saturday 4 February 2023

Stainless Steel Coffee Grinder USB-C

I posted about my Bialetti Moka Pot a few weeks ago. I realised when I puchased the Moka Pot that I need a grinder for the coffee beans. I learned that the coffee powder cannot be too fine as it will go through the perforated holes in the funnel tank of the Moka Pot.

I bought this Electric Stainless Steel USB coffee bean grinder online.


The reasons I got this are
- it is ultra portable as it uses Li-Ion battery via a USB-C port.
- the charging is very fast and there is a light indicator from red to green which indicates that it is charged.
- it has 4 level of grind, as you can see from the picture. Near the bottom of the grinder, there are dots indicating the grind size. You twist the indicator below the dots to select the grind size. 

- it is stainless steel, which goes well with most kitcher decor. It exudes a professional feel and the weight of the item is not that heavy.
- the coffee beans go through the top and the grinded coffee comes out below. The container below can be removed to take out the coffee powder.


Just 2 removable parts, the cover to put in the beans
and the container below it for the grinded coffee.


The USB-C port for charging the grinder and the 
small bulb above it to indicate the status.


The only disadvantage I have is, I am not able to clean the inside part of the grinder. The whole body is fixed and I have to get a brush to remove the old coffee in the grinder chamber. 
Is it suppose to be that way?

Do you have a manual grinder?
How do you clean it?

Thursday 19 January 2023

Bialetti Moka Express Pot

I did a family trip to Italy in Dec 2022. One of the things that the wife and I really enjoy is the espresso over there. I have had espresso before but the ones in Italy opened my eyes and my tastebuds. Italians really make a very good espresso.


When I got back home, I decided to get a Bialetti Moka Express. This is the original coffee maker made in Italy. According to their official website, its unique shape dates back to 1933. 


It has a unique shape that has not change much since it was created in 1933.


There are 3 parts to the Moka pot. From left, the water chamber, the filter and
the coffee pot.


Water is filled up to the pressure valve. Hot water preferred as the duration
of the coffee preparation is shorter.


Ground coffee is place in the filter. The coffee cannot be too fine as it will 
enter the holes of the filter.


Place on the stove with a slow heat, which I prefer. Once it is ready, coffee will
start coming out from the spout.


With a low heat, coffee will slowly pour out from the spout.


There are several things I learned from making coffee on the Moka pot
- the coffee beans, and how fresh it is makes a taste difference.
- the grinding of the beans cannot be too fine as it will clog the filter. A suitable grinder is very important.
- the Moka Pot cannot be washed with dishwashing detergent, just water. When the coffee is made, there will be coffee oil generated. The coffee oil protects the Moka pot, ensure its lasting usage and flavour. Using dishwashing detergent will remove this oil. That is why, you will see household Moka pot heavily stained. It is done on purpose.
- the minute it starts gurgling out, it has to be removed from the stove to prevent the coffee from having a 'burnt' taste. 
- the heat for the Moka pot cannot be too strong as the coffee will have a burnt smell. The coffee will also spurt out from the spout
- the minute the gurgling is heard and coffee starts coming out from the spout, remove the Moka Pot and serve. That is the best coffee.

Do note that the Moka pot does not produce espresso-type coffee due to the pressure difference. The moka pot does not produce the crema. That is only obtained from an espresso machine where it will push the water at 6-8 bar pressure. The moka pot only pushes the water at 2 bar pressure. But even then, the taste is really wonderful. 

I do not have space for an espresso machine in my kitchen. But for the moment, the Bialetti Moka pot is a very good replacement. I really enjoy the coffee it produced. 

Belissimo!


Saturday 3 April 2021

Kartell Ghost Chair Glide Replacement

 I have 2 pairs of Kartell Ghost Chairs. One problem with the Kartell chair is the materials that was used for the glides. The rubber material disintegrated slowly in this humid weather. I changed it to felt glides, which I blogged about it here

But after usage, the glides turned dirty and began to collect dirt and hair. It was not what I had expected. I decided to replace it again with, I hope, a much effective solution.

These are silicone leg protectors, with the dimension of 25x25cm that is the closest to the dimension of the Ghost chair legs.

Wrapped.


Unwrapped next to the dirty glides.

The glides that I replaced sometime back was very dirty. It is felt so it traps dirt. See below.

Arrgh....dirty!


Another view of the felt glide.

I removed the felt glide. Inside the leg, is part of the original rubber glide. It has slowly disintegrated and perished in this weather. You can tell as it has turned a dirty yellow colour.

The felt glide removed. 


The original Kartell glide, removed.


Both original and felt glides removed.

With the inside legs cleaned, it was just a matter of slipping the silicone over the leg. It was a tight fit but in this humid weather, it would expand and bind into shape.


A snug fit.


Fits in nicely.


Another view


Fits in nicely.


Being a colourless, it fits in nicely with the Bougie Ghost chair.

Finished. 


Friday 15 February 2019

Google Home

Google Home

On the June 2018 PC Show, I bought the Google Home and Google Home Mini at a bundle price of SGD189. But it was only recently that I have installed it as I got the TP Link Smart Bulbs and Smart Plugs to go with it.

The specifications of the Google Home:


Dimensions
Diameter: 3.79 in (96.4 mm)
Height: 5.62 in (142.8 mm)
Power cable: 70.8 in (1.8 m)


Weight
Device: 1.05 lbs (477 g)
Power adapter: 4.58 oz (130 g)


Colors
Body: White
Base: Standard base is slate fabric.


Supported Audio Formats
HE-AAC
LC-AAC
MP3
Vorbis
WAV (LPCM)
Opus
FLAC with support for high-resolution streams (24-bit/96KHz)


Wireless network
802.11b/g/n/ac (2.4GHz/5Ghz) Wi-Fi for high-performance streaming
Note: WPA2-Enterprise is not supported.
Bluetooth® 4.1
Supported bluetooth profiles
AVRCP controller
AVRCP target
A2DP sink
A2DP source
GATT server
GAP


Speaker
High excursion speaker with 2" driver + dual 2" passive radiators delivers clear highs and rich bass
Far-field voice recognition supports hands-free use


Power
Required 16.5V, 2A included


Power Adapter
100-240V-1.1A 50-60Hz


Ports & Connectors
DC power jack
Micro-USB port (for service only)


At first I was skeptical on the usage of Google Home. As a standalone device, it is quite useless. I do not need it to get info when I can get it from my mobile phone. But when I hook it up to the smart bulbs and smart plugs, that is when it's usage is very powerful. My living room lights turned on at 7pm every night and turn off at 12 midnight. More details on my next blog

Here are the unboxing photos:


Box-Front


Box-Side


Box-Side


Box-Side


Ohhh yeah baby...


Most importantly, is the UK plug. Instructions manual quite
minimal as the set-up is very easy.


Set-up is done via the Google Home app.


If you are just getting the Google Home for fun, I would advise you do not waste your money as the novelty would wear off very fast. However, if you intend to automate your home with some basic stuff, then that is where the Google Home is most effective. It is able support a lot of 3rd party apps on the devices section of the app, and that list is growing.


Monday 25 June 2018

GoPro Hero 5 Black

It has been awhile since I have bought anything from an IT Show. At the recent PC Show from 31st May to 3rd June 2018, I bought the GoPro Hero 5 Black for SGD440. There was a good package for that price because it includes:

- the GoPro Hero 5 Black
- the Shorty (Mini extension pole with tripod)
- the Casey which is a hardcover accessories case
- the Chesty, which is the performance chest mount. Must be tough for them to think of the names of their accessories.
- 32GB Extreme Sandisk Memory card

All these worth about SGD610 originally.

In addition, I bought the Dual Battery Charger. It comes with an extra battery since the GoPro already includes a battery. Having a spare battery is always good as I found out the GoPro battery does not last long, especially after extensive usage.

The GoPro Hero 5 specs:
Photo: 12MP / 30fps Burst
Video: 4K30
Waterproof: upto 10metres
Voice Control: Yes
Video Stablization: Yes
Touch Display: Yes
Karma Compatible: Yes

Advanced Settings
Auto LowLight: Yes
Exposure control: Yes
Protune: Yes
3.5mm Audio Mic In: Yes

Audio Features
Advanced Wind Noise Reduction: 3-mic processing
Stereo Audio: Yes
RAW Audio Capture: .wav format

Connected Features
Wifi + Bluetooth: Yes
GPS: Yes
Connects to GoPro App: yes
HDMI Video Out: Yes

Unboxing

Hero5 - Front

Side with items included

QuukStories is the GoPro app to edit the
videos.

Summary of capabilities.

Includes the frame

Various Youtube videos mentioned about
keeping the blackbase

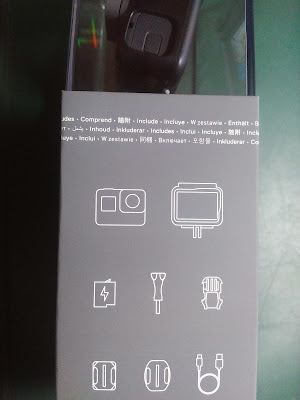
Standard package items. The GoPro uses USB-C as
the charging and data cable.

With the documentation.

Another view of the items and the battery provided.

It comes with 32GB Extreme Memory card.
I bought this 64GB in this picture. 
I have used the GoPro video on my recent trip to Bali, a few weeks after I purchased it. The video quality is amazing, even in the water. I can see that it tries to stabilises the video during shooting but the best result will be using a gimble. At night, the GoPro is almost useless. So I have to switch to a normal point and shoot camera. 

Saturday 5 May 2018

Kartell Bourgie Lamp Dimmer Switch Replacement

I have a pair of Kartell Bourgie Lamps which I blogged about here.  The old Bourgie lamp has a very bad dimmer switch. It does not last long, which I also blogged about here

Thankfully, Kartell has a replacement dimmer switch is so much better than the original one. It is not cheap though but it is definitely worth the change.


I bought 2 replacement dimmer switch.


The dimmer switch with instructions.


The original dimmer switch on the left. The problem with it
was the roller was very flimsy. The new switch is a slider. 


Another view.


The back view. Its quite cool that it has PC board.


Instructions with no words.


Need to be careful in removing the original wire.


On the left of the switch, it is indicated L for Live and N for
Neutral. So the wire that is removed from L, I have labeled
with Red tape, as can be seen on the bottom left hand corner.


On the other side of the switch, take note of the N - Neutral
wire.


The broken switch that needs to be replaced,
The Red labeled wire is the Live wire.


The tools that I used for this project.


The wires properly labeled.


Using the spudger to lift up the slider switch.


Once the slider is taken off, the 2 screws
underneath needs to be removed.


With the cover removed.


With the white wire holder removed. You
can see a small N letter on the bottom
screw.


So the blue wire goes to Neutral.


With both ends connected.


With the back screwed back and the slider in its place.


Thankfully, it worked when turned on.